How to build a foam boat video. Foam boat
The problem of a small fishing boat was decided unexpectedly simply. I had a foam plastic that previously served as a wall covering for an old house. Being familiar with the technology of building a boat of foam, knowing the process of pasting the hull with fiberglass, I still looked into "Boats and Yachts" and, to my surprise, I found that the description of such a boat was last found only in 1975. I consider the lack of attention to such boats undeserved, as it has a number of undeniable advantages as foam plastic. In the boat it is warm, it does not rattle, which is important when fishing, has a low weight and a huge reserve of buoyancy. The construction process is simple and takes a little time.
Basic boat data
The boat "Gamma", built by Yu. Nikiforov, did not suit me because of the complexity of the design. For such a boat, simpler contours are enough, with a flat, without lifting up, bottom and transom nose. The statement of Yu. Nikiforov regarding the exploitation of the “bare” foam body, without glass fiber pasting, was also in doubt. Based on these considerations, I built a boat using the following technology in a few days from the PVC foam. First cut and drove three large sheets of foam. Of them stuck the bottom. Then using the support, similar to the rack-keelblock "Gamma", made the final assembly of the hull. The 40 mm thick foam plates were joined to each other with epoxy glue based on ED-5 resin.
Polystyrene PVC can be replaced by another - grade PS-1 or PSBS. They also cut well with a sharp knife and sawed with a hacksaw. Yu. Nikiforov cut foam plastic nichrome string, heated by connecting it and the electrical grid. However, it should be borne in mind that PS foams containing styrene are dissolved by polyester resins; therefore, it is possible to glue body parts or glue it with fiberglass only on an epoxy-based binder.
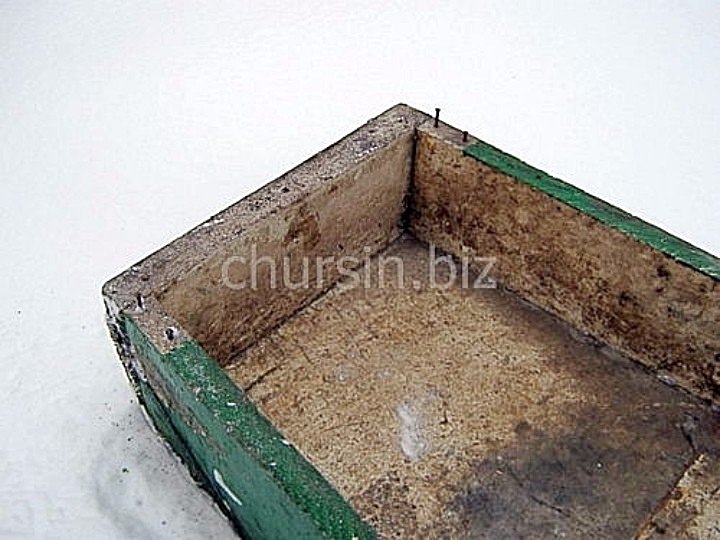
The body without glass fiber wrapping weighs 20 kg, however, the operation of such a boat will require great care, as foam will wear out quickly and even a touch of a lit cigarette can ruin your child. To give the body greater rigidity and strength, in this case, you should put a couple of cans, bursting the side. Along the perimeter of the case it is necessary to fix an oak bar - flange on the glue and screws. Not be superfluous and two strips on the bottom, which will protect it from abrasion when pulling the boat to the shore. It is also necessary to protect the butt joints outside the case, pasting them, for example, with strips of cloth.
We decided to paste over the case outside with fiberglass. The weight of the hull increased slightly, but the durability of the boat increased.
Instead of a jar, I use a small height foam plate: sitting on it, I am protected by the sides from the wind. The boat goes well under the oars, easily sneaks into the reeds, thanks to a rather sharp nasal contours.
Oars about 2 m long with flat blades 350X150 mm - kayak type. To use the outboard motor, the transom must be reinforced, as shown in the diagram.
Usually, amateur shipbuilders, when meeting with any new material, evaluate it primarily from the point of view of applicability for building a boat. Polyfoam was no exception. It immediately began to be used as insulation, to ensure floodability, when building fiberglass vessels - for the manufacture of assembly units. But for some reason, foam is not used as the main structural material, although, in my opinion, small boats, shuttles and tugs, can and should be made of it.
Instruction
Properties of foam and expanded polystyrene
High thermal insulation. In terms of heat retention, foam plastic overtakes most insulation materials.
Ease. With all its effectiveness, foam plastic weighs surprisingly little, since 98% of its mass is air. If you compare the expanded polystyrene on this property with other insulating materials, the following proportion is obtained:
The foam plate 50 mm thick is:
. 100 mm of mineral wool;
. or 200 mm of wood;
. or 325 mm expanded clay;
. or 900 mm bricks;
. or 1400 mm of concrete.
From this it turns out that the insulation of the foam, taking into account the installation work, costs 20-50 times less than the insulation of other materials. And its use will save some more money on heating!
Foam properties
Environmental friendliness. Absolutely safe, therefore it is also used in the food industry. Styrofoam prevents the formation of bacteria and mold. It can be freely used at temperatures: from - 60 to + 80 degrees.
Security. It is recognized that during combustion, the foam will emit the same elements as the burning wood. And the latest improvements allow us to endow the foam with resistance to fire. The substance included in the foam plastic fire retardant prevents combustion and promotes self-extinguishing. It belongs to the group of flammability G4.
Water resistant. The foam during the year absorbs from 1.5 to 3.5% moisture. That speaks about its high level of moisture resistance. It is worth noting the fact that there is a direct relationship between the breathability and moisture resistance of the foam. The first feature enhances the second. This property allows homes to "breathe."
Strength. Under the influence of mechanical loads in foam plastic - polystyrene foam, a visco-elastic reaction is observed, which ensures its high strength. Its compressive strength is at least 0.04-0.20 MPa. At the same time, the material retains its original size and does not change the location.
Soundproofing. The foam finish allows to increase the protection against external noise by 2-4 dB.
Equipment
Polyfoam manufacturing technology
The basis of the foam is polystyrene - a thermoplastic polymer. Due to its water resistance, the ability to take any shape under the influence of temperature, frost resistance, polystyrene is widely used in industry (use case: creating a container for yoghurt). However, polystyrene is still nepoplast. 
It is produced by foaming polystyrene granules. After foaming, they are treated with heated water vapor, after which the whole procedure is repeated.
Cyclic foaming processes can significantly reduce the density of polystyrene granules, which leads to a decrease in their weight. After secondary foaming, the foam needs to be dried. Drying is the removal of residual moisture from the surface of polystyrene foam (water does not enter the inside - the foam-waterproof material).
Drying takes place in the open air - it is at this stage that the air fills the pores of the material and it acquires a complete form. The size of the granules can vary from 5 to 15 millimeters.
Dried expanded polystyrene needs molding. The processed material is pressed using special machines and subjected to tertiary treatment with hot steam. As a result of molding, it looks like a block of white color of a certain thickness. The block is cut into the required forms and in this form is sent to the customer.
Important: the foam can be cut not only in accordance with typical parameters, but also in accordance with the individual dimensions required for a particular construction.
Styrofoam cutting is performed on machines with horizontal and vertical type of cutting. When cutting its structure is not damaged, molding is fast. The only technological condition: the temperature in the workshop, where cutting is done, should not fall below 18ºС, otherwise the foam will break (crumble).
Another feature of production: the technology itself, and raw materials are relatively cheap, which can significantly reduce the cost of the final product. It is safe to say that the foam is not only a safe and reliable insulation, it is also one of the cheapest.
The low price of the material in combination with its functionality makes it especially popular in civil engineering.
Do it yourself
Durability and durability of polyfoam
The foam does not have a high density (50 times lower than that of water), but, nevertheless, it shows excellent resistance to uniform mechanical loads, both in tension and in compression.
Polyfoam is able to withstand pressure for years without being deformed, without collapsing and without changing its physical properties. A vivid illustration can be its widespread use in the construction of runways. The strength index largely depends on the thickness of the polystyrene foam plate and on compliance with the rules of its installation. 
The durability of the foam was detected in the course of research, both in laboratory and in natural conditions. Since expanded polystyrene is, in fact, plastic, scientists expected to get high levels of durability. During the research, their expectations were fully justified.
So, expanded polystyrene is capable of retaining its original thermophysical properties for several decades, without being deformed and without losing its structure. It was also found that it is able to withstand short-term exposure to low (limit -180ºС) and high (+ 95ºС) temperatures. This makes polystyrene foam an ideal insulating material in the Russian climate, and also expands the scope of use of the material - for example, let's say its contact with molten bitumen.
The construction of the boat begins with the manufacture of paper patterns of all side, bottom and bulkhead plywood parts. After that, they begin to cut the plywood, given that all pieces must be cut along the fibers of the outer layers (shirts). A small allowance is made for processing the ends. Details of the sides and bulkheads are cut in pairs. Then slats are cut for longitudinal and transverse set. Workpieces must be marked with double numbering: the first digit is the section number, and the second is the part number (for example, 3-11, etc.).
On the patterns with a pencil put the exact contour and the place of gluing the details of the set (laths). Both surfaces are smeared with glue, they are pressed against the slats. Joints connect in the half-tree. For protection against slipping, the corners are temporarily grabbed with small nails (not fully). Immediately before the glue hardened, the bead was turned over and the slats were fastened on the plywood side with 2x10 “snake” screws with a pitch of 50-60 mm. Billets for internal bulkheads and transom do the same. For the nasal section, straight-line slats cannot be applied - they are made of glued plywood. To do this, cut 16 narrow (30-32 mm) strips of plywood 650 mm long. On a thick board with a size of 700x200 mm, life-size contours of the upper (free beam) and lower (zygomatic stringer) slats are drawn. The contour is filled with 75 mm nails to a depth of 15-20 mm. Then the blank strips are smeared with glue and inserted into the template formed by nails. In order to tighten the strips more tightly during drying, a twine is passed through the snake at the top of the nails. The second pair of blanks are glued in the same way. The edges of the glued blanks are processed with a file and sandpaper.
A stem (bow bar) is hewed out of an oak bar. For fixing the ends of the fenders and the zygomatic stringers in it make side-grooves. Then the zygomatic stringers, stem and nasal bulkhead are joined with glue and screws, and the top of the stem is connected to the top of the bulkhead with a temporary strip on the screws. After that, billet beads are put immediately on glue and screws, and the blanks of the fences are “wrapped around” on top of them. It is necessary to check the symmetry of the whole structure.
In a day, when the glue “grasps”, a bottom and a deck are laid in which a hole of 180x200 mm for the baggage hatch is pre-cut. Then on a sheet of paper (preferably graph paper) draw one inside the other squares and the contour of the nasal section, corresponding to the size of the upper section of the future boat - this will make it easier to glue the sections together and eliminate the need to correct the distortions. On the floor, on a sheet of paper - a template, all sections are assembled on glue and screws - first the sides and bulkheads, and then the bottom sheets. After that, the fenders (with spikes and sockets) are fitted and installed, the boat is temporarily assembled with bolts and treated and filed with a file and sandpaper. This operation should be performed twice. 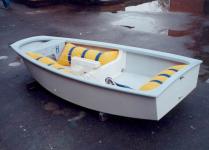
All sections and blanks of bottom stringers are impregnated with hot linseed twice. After the second impregnation, incubated for 4-5 days. The dried sections are lightly scraped with sandpaper and once again put together for the final control of all the joints. Then the sections outside are wiped with a swab dipped in gasoline or white spirit to degrease the surface.
After that, the bottoms of all five sections are pasted over with glass cloth on epoxy glue with the addition of 10-15% acetone as a diluent. The edges of the fabric are folded and lowered to the sides by 50-80 mm. At the same time, narrow strips - scraps of fiberglass on the same epoxy glue fix all the outer corners of the sections. Immediately, before the resin is set, a stringer smeared with the same glue is applied to the bottom and fixed with 3x15 screws with a pitch of 80-100 mm.
Two days later (48 hours) after the resin hardens, the boat is again treated with emery paper (especially at the edge of glass fabric), and then painted with the first layer of paint. After the paint has dried, all the metal parts are installed, the wiring of the tie-down cable, fitting of the seats (cans) and the hatch cover are done. Holders of oarlocks are made by riveting from pieces of duralumin of suitable thickness. In the extreme case, it is made of oak or beech wood with a steel strip. Oars (collapsible, swing) are made from three cuttings from the shovels, aluminum tubes of suitable diameter, tightly fitting one into the other, and aluminum blades 150x400x1.5 mm in size. In the second, third and fourth sections, it is desirable to make light tide along the length of sections with a width of about 400 mm. They are made of rails 10x15 mm with a pitch of 25 mm, connected by three narrow transverse dural stripes.
The cable is secured by a loop in the tensioner from the keel point of the transom; then it goes on both sides of the keel stringer to the stem; on the stem, it crosses twice in the grooves under the cover plate and returns to the stern along the sides under the fender; the ends of the cable are fixed in the tensioners in the upper corners of the transom (lanyards). Time for the construction of the boat will take about 150-200 hours (this depends on the joinery "qualification" of an amateur).
Firms
Foam properties
First of all, they emit thermal properties of foam plastic. This is an excellent insulating material, which is used in almost all areas of construction of both industrial and civil structures. The thermal conductivity of polystyrene is 3 times less than that of expanded clay and wood, and 17.5 times lower than the thermal conductivity of bricks. 
For comparison, if you take 12 cm of foam, they are equal to about 210 cm of brickwork. Such thermal characteristics of polystyrene can significantly save energy, which is spent on space heating. In addition, this material also has excellent sound insulating properties. This is explained primarily by the porous structure of the plates. The thicker the material, the better the insulation will be.
Also an important property of the foam is its resistance to various chemical influences, as it is made from environmentally friendly components. It does not form an environment conducive to the development of fungus and mold, so there are practically no problems during operation. And, of course, it is impossible not to note its moisture and fire resistance.
It does not sustain burning. But at the same time he is able to emit harmful gases (this is his undeniable minus).
The durability of the material and its high strength characteristics allow it to be used in the construction of the most serious buildings and structures. Numerous tests have shown that the foam is able to withstand significant mechanical loads and is not deformed. And it fits simply enough, as it has a small weight.
Specifications
Styrofoam and its properties
Year by year, the cost of heating increases in parallel with the rising cost of energy. And at the same time, in the cold season, the heat literally evaporates from the house. Heat loss is really enormous. The vast majority of buildings in Russia that are not warmed with protective materials lose more than 600 gigacalories of heat per square meter. For comparison, in Germany the same indicator is equal to 40 gigacalories. A material called polystyrene will help to solve the problem of huge heat losses. Expanded polystyrene has a whole set of characteristics So, we list them.
Heat conductivity
The material has excellent thermal insulation properties, primarily due to the structure. The structure of polystyrene is a set of balls fastened together, each of which consists of a huge number of cells with air inside. This air is not able to move, and that it performs the function of a heat insulator. The thermal conductivity of the material increases with increasing its density. Polystyrene retains its characteristics in the temperature range from -50 to +75.
Moisture absorption and vapor permeability
Extruded polystyrene compared with polystyrene has a much higher vapor permeability due to the fact that steam penetrates the balls that form the basis of the material (and hence in their cells) along the sides cut during the molding process (the foam is molded without cutting). With moisture absorption, everything is exactly the opposite: moisture permeability is greater, because foam polystyrene is denser than foam.
Strength
Due to the presence of stronger bonds between the molecules of extruded polystyrene foam, its strength is higher than that of the foam. This is why foam is used less and less.
Reaction to organic and chemical products
Expanded polystyrene does not react to solutions of soap and salt, groundwater, emulsions, mineral fertilizers, solutions based on gypsum, cement, bituminous resins, etc. Turpentine, acetone, drying oils and some types of varnishes have a negative effect (up to dissolution). Ultraviolet is detrimental to the open surfaces of the material - strength and elasticity under its influence are lost. The foam is not an exception. It immediately began to be used as insulation, to ensure floodability, when building fiberglass vessels - for the manufacture of assembly units. But for some reason, foam is not used as the main structural material, although, in my opinion, small boats, shuttles, tuziki and simple home-made boats can and should be made of it. Let me remind you of the main advantages of foam plastic over the "traditional" materials commonly used for the construction of such boats (we will not talk about thermoplastics that are not yet available).
Polyfoam is light, has sufficient strength, high thermal insulation qualities, is well cut and sawn (foams like PS-1 and PSBS are perfectly cut with a nichrome string heated by connecting electric current to it), well glued. On the other hand, it is impossible to bend foam. To test the capabilities of the foam grade PS-1, I made him a non-selectable unsinkable rowing boat "Gamma", which, with a weight of about 20 kg, has a load capacity of 120 kg and is quite convenient to operate, especially when going fishing in a car. Main dimensions of the boat: Length is the greatest, m 2.60 Width across the plate width, m 1.05 Width across the bottom, m 0.78 Board height amidships, m 0.38 Board height at the extremities, m 0.40 Ways to make a boat by yourself! When designing, the choice of the hull form turned out to be the most difficult: it was necessary to make a flexible, easy-to-make and convenient little boat out of flat elements. In the end, it turned out to be a tuzik with a transom nose and aft, keeled fore part, sloping (with collapse) sides and a flat bottom slightly elevated to the stern (the stern fin is set here). Online store fishing products.
Homemade boat. HOW TO MAKE A BOAT FROM FOAM “Gamma” - a foam boat A foam boat (we recommend watching homemade boats) “Gamma” afloat. Usually, amateur shipbuilders, when meeting with any new material, evaluate it primarily from the point of view of applicability for building a boat. Polyfoam was no exception. It immediately began to be used as insulation, to ensure floodability, when building fiberglass vessels - for the manufacture of assembly units. But for some reason, foam is not used as the main structural material, although, in my opinion, small boats, shuttles and tugs, can and should be made of it. Let me remind you of the main advantages of foam plastic over the "traditional" materials commonly used for the construction of such boats (we will not talk about thermoplastics that are not yet available). 
Polyfoam is light, has sufficient strength, high thermal insulation qualities, is well cut and sawn (foams like PS-1 and PSBS are perfectly cut with a nichrome string heated by connecting electric current to it), well glued. On the other hand, it is impossible to bend foam. To test the capabilities of the foam grade PS-1, I made him a non-selectable unsinkable rowing boat "Gamma", which, with a weight of about 20 kg, has a load capacity of 120 kg and is quite convenient to operate, especially when going fishing in a car. Main dimensions of the boat: Length is the greatest, m 2.60 Width across the plan width, m 1.05 Width across the bottom, m 0.78 Board height amidships, m 0.38 Board height at the extremities, m 0.40 When designing the most difficult thing It turned out to be the choice of the hull form: it was necessary to make a portable, easy to manufacture and convenient little boat out of flat elements. In the end, it turned out to be a tuzik with a transom nose and aft, keeled fore part, sloping (with collapse) sides and a flat bottom slightly elevated to the stern (the stern fin is set here).
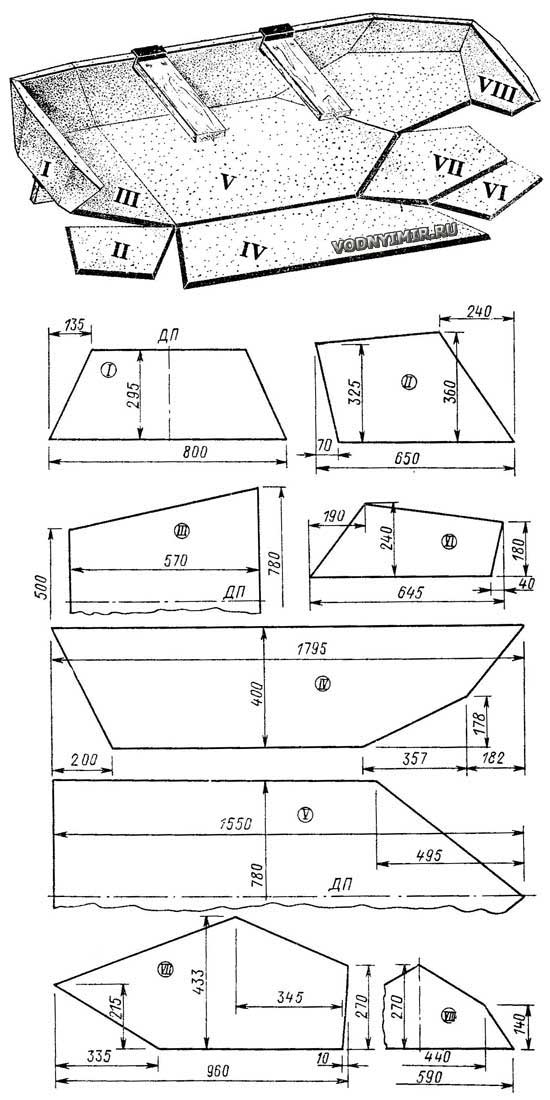
Theoretical drawing of the hull of the boat from the foam Theoretical drawing of the hull of the boat from the foam Cutting of the boat parts from the foam Cutting of the boat parts from the foam. zoom 1248х2642, 326 KB I - aft transom; II - aft of the side (2 pieces); III - aft part of the bottom; IV - board (2 pcs.); V - bottom; VI - the nose of the bead (2 pcs.); VII - zygomatic sheet (2 pcs.); VIII - nasal transom. Separate flat parts with a thickness of 30 mm form a monolithic structure after gluing. The transoms are made of a sheet twice as thick and smoothly sloping along the contour. The joining edges of the parts to be joined are cut at an angle, as shown in the sketch. This gives an increase in the area of gluing along the joints and somewhat simplifies the cutting of sheets, since there is no need to recalculate the dimensions for the thickness of the connecting part. The construction of the boat can be divided into three stages: cutting sheets - manufacturing of hull parts; fitting parts at the joints - assembly; bonding and final finishing. For more efficient use of the material when cutting sheets, I recommend cutting pattern patterns out of thick paper. If you do not have confidence in the straightness of the edges, only one of them should be cut "at an angle"; the edge joining it will have to be customized during assembly. For the convenience of fitting and assembling, it is best to make a pile of five pairs of “transverse” and two pairs of “longitudinal” keel blocks, fixing the position of the bottom and sides, as well as the bow and stern transom. Pasting can be made by any glue recommended for polyfoam.
I used epoxy glue based on ED-5 resin. After the glue has completely stood up, he has sharpened the free edge of the board and put a wooden bead on it around the perimeter of the hull - an oak strip on the glue and screws. For reliability in all corners and butt joints at the level of the upper edge of the bead, outside imposed a longitudinal strips made of AMg alloy (strip 1.5X20, 130 mm long, on the side from the axis of the joint). The fodder fin set on the bottom was also bound with the same strip. After puttying and stripping, the casing was coated with nitro enamel on the outside and inside. This protection turned out to be practically enough, so it is quite possible to do without glass fiber gluing of the foam, etc. The removable cans, which simultaneously serve as cross-links, bursting the sides, are made of wood on the Gamme. They will be easier if they are cut out of foam plastic, by running around the edges of reinforcing wooden slats. Banks are hung on the sides with the help of clips - grips, bent from scraps of alloy AMg. The steering wheel is hung on the pins, set on the aft transom. Having already begun testing the Gamma, I still doubted the correctness of the choice of material, fearing for the strength of the foam body. However, with each new exit I gained more and more confidence in my boat. Swimming in a variety of conditions, transportation and dragging with drag, when it is difficult to exclude all sorts of blows, sometimes very strong, showed that the boat is strong (even when it is not fixed by banks) and reliable. And there is nothing to say about floodability: it is almost impossible to drown Gamma. There is a foam boat (see the photo homemade toy boats) and other specific advantages. The complete lack of recruitment and any slurry helps to keep the inside of the boat clean. Due to the good thermal insulation qualities of the foam in the boat, you can sit directly on the bottom; when she is pulled ashore, I am settling there for the night without risking a cold from the ground. When recommending polystyrene for making light tuzik shuttles, I want to mention one of its minus: it is afraid of fire! In other words, it should be remembered that the proximity of the fire can spoil your boat; even the touch of a lit cigarette melts the foam.
The theoretical drawing is the basis of the project of any boat, and you cannot do without it when building a ship. Drawn on paper, it is, however, unsuitable for construction works: a small scale leads to errors when taking measurements and, most importantly, does not allow to mark the details of the case directly.
For the construction of the hull of the boat theoretical drawing must be made in full size. Such a drawing is called a laydown or a draft drawing; it is drawn on a flat wooden floor or on large plywood sheets - a plaza. Deviations when performing a plaza and removing templates from it should not exceed 1-2 mm. In order to move from a theoretical drawing, made in the design to the scale, to the plasma one, a table of the floor ordinates is compiled. In this table, the ordinates are indicated in full size, that is, the dimensions taken from the theoretical drawing are multiplied by its scale. Ordinates are set for all curved lines of a theoretical drawing by frames and grouped by projections. The water group is given the heights from the main line of the tongue (wedge-shaped notch in the keel and the stem for the sheathing boards that stick to them), buttocks, decks, cheekbones, keel; in the other group - half-widths (from the diametral plane, hereinafter - DP) of the waterlines, cheekbone lines and sides at the deck; ordinates of fishes. Some dimensions, such as dimensions for the construction of the outlines of the stem and fins, are not included in the table of plasd ordinates, but are usually indicated on the theoretical drawing itself.
Of course, to use the table of the ordinates, you need to know at what distances the cutting planes are located one by one, that is, the distance between the frames is the spacing, as well as the distance between the waterlines and between the buttocks.
It is known that the position of any point in space is uniquely determined by three coordinates relative to three mutually perpendicular base planes. The ordinate table is a set of coordinates, which are used to set the position of a large number of points that fix the position of the vessel hull surface in space. Thus, in numbers, in a very convenient tabular form, an arbitrarily complex case shape can be “programmed”. For the construction of the boat almost only one projection of the theoretical drawing is needed - the “Body” and the outlines of the pivot. The projections of “Half-width” and “Side” are used only for matching lines.
To save space on the plaza, you can draw the projections "Side" and "Semirashire" one on another. Well, if the lines will be different colors. On the Corps projection, the branches of the right and left sides of the frame should be drawn. It is better to combine the ribs (by the color of the lines) into the bow and stern groups (counting from the mid-section).
The use of an inaccurately constructed theoretical drawing can lead to alterations. With a layout breakdown, the builder can draw any part of the hull on it in full size. There are few such details. This is primarily the keel, stem, stern-bush, transom, knopa, knits of ideas and timber bars. All this constitutes the tab of the vessel. The bookmark owes its name to the fact that when assembled it forms, as it were, the basis of the whole set - the skeleton of the vessel. The height of the keel is usually indicated on the constructional drawing in several sections, the width is taken taking into account the half-width of the tongue from the table of lay ordinates. The cross-section of the keel, like any other longitudinal connection, is easy to build directly on the “Projection” projection on any theoretical frame. To calculate the tongue on the stem, you need to use another projection - “Half-width”, on which sections of the stem along the water lines are presented in their true form. 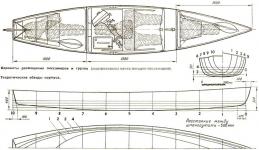
Using the markup on the plaza, they make templates for which it is easy to lay out the details of the bookmark on wooden blanks, and then process them into a “pure size” that exactly corresponds to the theoretical drawing. Other details of a complex shape are drawn on the plaza, for example, foundation bars for the engine (the position of the shaft axis must first be marked), the position of the longitudinal links is specified and their cross sections on the frames are depicted (if necessary, cut-outs for the passage of stringers are made in the transverse set).
The amateur-builder can not always completely draw a theoretical drawing of even a small boat, as for this it is necessary to have a fairly large free space, appropriate tools: long flexible slats - rules, clamps - rats for fixing the position of curved rails, etc. d., and most importantly - sufficient skills. Having a table of ordinates, you can limit yourself to breaking down only one, the most necessary and small in area projection - “Case”, putting it on a sheet of thick paper, which can be easily folded into a roll and removed during breaks in work. If on such an improvised plaza you also draw a contour of the stem and the angle of inclination of the transom, this will be enough to assemble the hull.
But one can dispense with the breakdown of a single “Case” projection only if practical frames are built on the theoretical drawing that are included in the set of the boat hull. If the frames of the theoretical drawing do not coincide with the practical frames, it is necessary to break into the plaza at least one more projection - “Half-latitude”. Having marked the position of practical frames on the projection of “half width” in accordance with the frame defined by the design drawing (the drawing, which shows all the components and details of the hull construction with basic dimensions), remove the waterline ordinates from these frames on the frames and transfer them to the “Housing” projection . In order to withstand the contours of the construction of the theoretical drawing (and only then the quality and type of vessel will match the projected), it is necessary to know the rule about the position of the theoretical lines of the structural elements of the hull.
The theoretical line is the line of the surface of the structural element, which coincides with the line of the theoretical drawing. Such lines for a wooden vessel with a plank or rack lining are:
outer skin line; in the manufacture of frames, stubs and keels, the thickness of the skin should be deposited inwards from the theoretical lines of these elements;
the line of the inner surface of the deck flooring, in other words, the upper edge of the beam, which coincides with the line of the beam of the theoretical drawing;
the stern edge line of the nasal frames and the nasal edge of the stern frames;
in the manufacture of frames and bulkheads by plasma breakdown (minus the thickness of the skin) it is necessary to strictly follow the rule of theoretical lines, then removing the beads (cutting the corner) when installing the skin will not change the contours;
edge line of carling and stringers, reversed by KDP.
When dividing the plaza of plywood and plastic boats, as a rule, the plating thickness should not be taken into account, i.e. the outlines of the frames are also theoretical lines (when deviating from this general rule, the corresponding table should be indicated in the ordinate table). All theoretical lines of structural elements are pierced in a drawing drawing and the necessary dimensions and patterns are already taken from them. To produce parts exactly according to the layout drawing is not all. It is necessary to put them correctly in place, i.e., fix every detail so that its position relative to the three reference planes: main (in height), diametrical (in width) and mid-frame (full) - strictly corresponds to the theoretical drawing and plazma . Therefore, when preparing for parts, the position of the control lines is transferred from the plating drawing: DP, waterline or any additional lines parallel to them with the indication of the distance to them. Genuine, for example, the position of the part is completely determined by the number of the frame; if this is not enough, the distance to the nearest frame is indicated.
Homemade foldable boat Matryoshka
The “matryoshka-boat” made from plywood by L. Afrin’s design consists of parts that fold one into the other during transportation, like a doll-matryoshka (Fig. 1). Such a boat is easy and convenient to transport, it can be transported by bus or train. It is very easy to manufacture and weighs only 12-17 kg. Loading capacity is 100-110 kg.
Fig. 1. The design of the boat from two sections: 1 - sheathing; 2,3,4 - details of the boat; 5 - rake
For the manufacture of the boat will need:
two sheets of 4 mm plywood size 1525 x 1525 mm
wide pine board thickness of 1.5-2 cm
thin slats
tin strip 2-2.5 cm wide (can be cut out of cans)
drying oil
Oil paint
50mm nails. 
First, two plywood blanks 1 and blanks 2, 3 and 4 are cut out of plywood, after having been upholstered with plywood trims on both sides. Cut out the blanks and sheets of plywood in the joints are coated with a thick oil paint, glue "Phoenix", "Unikum" or epoxy glue.
Then plywood casing 1 is nailed to parts 2, 3 and 4. To prevent chipping at the edges of the plywood, pre-drill the holes along the edges of the casing with a Ø2 mm drill. The assembled bow and stern parts of the boat are connected so that the bow is found at the stern by 3-4 cm. All joints are covered with tin stripes, and before the upholstery they coat the surface with thick oil paint. After that nail the rail-keel on the bottom of the boat and the slats on the sides.
The finished boat is treated inside and out with hot linseed oil, and after drying, the vessel is covered with two layers of oil paint on both sides, carefully sealing up all the slots and grooves. The bow of the boat is made of dense construction foam, the sheets of which are glued together with epoxy glue or oil paint on natural drying oil. After that, the nose of the boat is covered with two or three layers of gauze, soaked them with epoxy glue or oil paint on natural drying oil. The finished nose is attached to the nose plate with two stud bolts. The forage part is also made of foam plastic.
Oars of the boat double, as at a kayak. The total length of the paddle is 220-240 cm. You can use ready-made metal or wooden kayak paddles, which are commercially available.
Usually, amateur shipbuilders, when meeting with any new material, evaluate it primarily from the point of view of applicability for building a boat. Polyfoam was no exception. It immediately began to be used as insulation, to ensure floodability, when building fiberglass vessels - for the manufacture of assembly units. But for some reason foam is not used as the main structural material, although, in my opinion, it can and should be made of it.
Let me remind you of the main advantages of foam plastic over the "traditional" materials commonly used for the construction of such boats (we will not talk about thermoplastics that are not yet available). Polyfoam is light, has sufficient strength, high thermal insulation qualities, is well cut and sawn (foams like PS-1 and PSBS are perfectly cut with a nichrome string heated by connecting electric current to it), well glued. On the other hand, it is impossible to bend foam.
To test the capabilities of the foam grade PS-1, I made him a non-selectable unsinkable rowing boat "Gamma", which, with a weight of about 20 kg, has a load capacity of 120 kg and is quite convenient to operate, especially when going fishing in a car.
When designing, the choice of the hull form turned out to be the most difficult: it was necessary to make a flexible, easy-to-make and convenient little boat out of flat elements.
In the end, it turned out the boat made of foam with a transom nose and aft, keeled fore part, sloping (with collapse) sides and a flat bottom, slightly raised to the stern (the stern fin is set here).

zoom, 1248х2642, 326 KB
I - aft transom; II - aft of the side (2 pieces); III - aft part of the bottom; IV - board (2 pcs.); V - bottom; VI - the nose of the bead (2 pcs.); VII - zygomatic sheet (2 pcs.); VIII - nasal transom.
Separate flat parts with a thickness of 30 mm form a monolithic structure after gluing. The transoms are made of a sheet twice as thick and smoothly sloping along the contour. The joining edges of the parts to be joined are cut at an angle, as shown in. This gives an increase in the area of gluing along the joints and somewhat simplifies the cutting of sheets, since there is no need to recalculate the dimensions for the thickness of the connecting part.
The construction of the foam boat can be divided into three stages: cutting sheets - making body parts; fitting parts at the joints - assembly; bonding and final finishing.
For more efficient use of the material when cutting sheets, I recommend cutting pattern patterns out of thick paper. After cutting all the parts along the edges to be joined, the angle must be cut off - the chamfer should be cut to the value n (see sketch above), which is determined by the formula depending on the central angle a and thickness of the sheet 6:

If you do not have confidence in the straightness of the edges, only one of them should be cut "at an angle"; the edge joining it will have to be customized during assembly.
For the convenience of fitting and assembling, it is best to make a pile of five pairs of “transverse” and two pairs of “longitudinal” keel blocks, fixing the position of the bottom and sides, as well as the bow and stern transom.
Pasting can be made by any glue recommended for polyfoam. I used epoxy glue based on ED-5 resin. After the glue has completely stood up, he has sharpened the free edge of the board and put a wooden bead on it around the perimeter of the hull - an oak strip on the glue and screws. For reliability in all corners and butt joints at the level of the upper edge of the bead, outside imposed a longitudinal strips made of AMg alloy (strip 1.5X20, 130 mm long, on the side from the axis of the joint). The fodder fin set on the bottom was also bound with the same strip.
After puttying and stripping, the casing was coated with nitro enamel on the outside and inside. This protection turned out to be practically enough, so it is quite possible to do without pasting the foam with fiberglass, etc.
Removable jars, which serve simultaneously as cross-ties, arching the sides, are made of wood on the Gamme. They will be easier if they are cut out of foam plastic, by running around the edges of reinforcing wooden slats. Banks are hung on the sides with the help of clips - grips, bent from scraps of alloy AMg. The steering wheel is hung on the pins, set on the aft transom.
Having already begun testing the Gamma, I still doubted the correctness of the choice of material, fearing for the strength of the foam body. However, with each new exit I gained more and more confidence in my boat. Swimming in a variety of conditions, transportation and dragging with drag, when it is difficult to exclude all sorts of blows, sometimes very strong, showed that the boat is strong (even when it is not fixed by banks) and reliable. And there is nothing to say about floodability: it is almost impossible to drown Gamma. The foam boat has other specific advantages. The complete lack of recruitment and any slurry helps to keep the inside of the boat clean. Due to the good thermal insulation qualities of the foam in the boat, you can sit directly on the bottom; when she is pulled ashore, I am settling there for the night without risking a cold from the ground.
When recommending polystyrene for making light tuzik shuttles, I want to mention one of its minus: it is afraid of fire! In other words, it should be remembered that the proximity of the fire can spoil your boat; even the touch of a lit cigarette melts the foam.
Usually, amateur shipbuilders, when meeting with any new material, evaluate it primarily from the point of view of applicability for building a boat. Polyfoam was no exception. It immediately began to be used as insulation, to ensure floodability, when building fiberglass vessels - for the manufacture of assembly units. But for some reason, foam is not used as the main structural material, although, in my opinion, small boats, shuttles and tugs, can and should be made of it.
Let me remind you of the main advantages of foam plastic over the "traditional" materials commonly used for the construction of such boats (we will not talk about thermoplastics that are not yet available). Polyfoam is light, has sufficient strength, high thermal insulation qualities, is well cut and sawn (foams like PS-1 and PSBS are perfectly cut with a nichrome string heated by connecting electric current to it), well glued. On the other hand, it is impossible to bend foam.
To test the capabilities of the foam grade PS-1, I made him a non-selectable unsinkable rowing boat "Gamma", which, with a weight of about 20 kg, has a load capacity of 120 kg and is quite convenient to operate, especially when going fishing in a car.
Main dimensions of the foam boat
Maximum length, m 2.60
Width according to plane gauge, m 1.05
Bottom width, m 0.78
Board height midship, m 0.38
Board height in extremities, m 0.40
When designing, the choice of the hull form turned out to be the most difficult: it was necessary to make a flexible, easy-to-make and convenient little boat out of flat elements.
In the end, it turned out the boat made of foam with a transom nose and aft, keeled fore part, sloping (with collapse) sides and a flat bottom, slightly raised to the stern (the stern fin is set here).
Theoretical drawing of the hull of the boat foam
Cutting foam boat parts
I - aft transom; II - aft of the side (2 pieces); III - aft part of the bottom; IV - board (2 pcs.); V - bottom; VI - the nose of the bead (2 pcs.); VII - zygomatic sheet (2 pcs.); VIII - nasal transom.
Separate flat parts with a thickness of 30 mm form a monolithic structure after gluing. The transoms are made of a sheet twice as thick and smoothly sloping along the contour. The joining edges of the parts to be joined are cut at an angle, as shown in the sketch of the boat. This gives an increase in the area of gluing along the joints and somewhat simplifies the cutting of sheets, since there is no need to recalculate the dimensions for the thickness of the connecting part.
The construction of a foam boat can be divided into three stages: cutting sheets - manufacturing hull parts; fitting parts at the joints - assembly; bonding and final finishing. 
Diagram of the angular connection of parts.
For more efficient use of the material when cutting sheets, I recommend cutting pattern patterns out of thick paper. After cutting all the parts along the edges to be joined, the angle must be cut off - the chamfer should be cut to the value n (see sketch above), which is determined by the formula depending on the central angle a and thickness of the sheet 6:
If you do not have confidence in the straightness of the edges, only one of them should be cut "at an angle"; the edge joining it will have to be customized during assembly.
For the convenience of fitting and assembling, it is best to make a pile of five pairs of “transverse” and two pairs of “longitudinal” keel blocks, fixing the position of the bottom and sides, as well as the bow and stern transom. 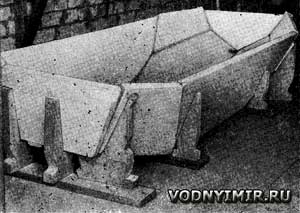
Glued body on the stocks.
Pasting can be made by any glue recommended for polyfoam. I used epoxy glue based on ED-5 resin. After the glue has completely stood up, he has sharpened the free edge of the board and put a wooden bead on it around the perimeter of the hull - an oak strip on the glue and screws. For reliability in all corners and butt joints at the level of the upper edge of the bead, outside imposed a longitudinal strips made of AMg alloy (strip 1.5X20, 130 mm long, on the side from the axis of the joint). The fodder fin set on the bottom was also bound with the same strip.
After puttying and stripping, the casing was coated with nitro enamel on the outside and inside. This protection turned out to be practically enough, so it is quite possible to do without pasting the foam with fiberglass, etc.
Removable jars, which serve simultaneously as cross-ties, arching the sides, are made of wood on the Gamme. They will be easier if they are cut out of foam plastic, by running around the edges of reinforcing wooden slats. Banks are hung on the sides with the help of clips - grips, bent from scraps of alloy AMg. The steering wheel is hung on the pins, set on the aft transom.
Having already begun testing the Gamma, I still doubted the correctness of the choice of material, fearing for the strength of the foam body. However, with each new exit I gained more and more confidence in my boat. Swimming in a variety of conditions, transportation and dragging with drag, when it is difficult to exclude all sorts of blows, sometimes very strong, showed that the boat is strong (even when it is not fixed by banks) and reliable. And there is nothing to say about floodability: it is almost impossible to drown Gamma. The foam boat has other specific advantages. The complete lack of recruitment and any slurry helps to keep the inside of the boat clean. Due to the good thermal insulation qualities of the foam in the boat, you can sit directly on the bottom; when she is pulled ashore, I am settling there for the night without risking a cold from the ground.
When recommending polystyrene for making light tuzik shuttles, I want to mention one of its minus: it is afraid of fire! In other words, it should be remembered that the proximity of the fire can spoil your boat; even the touch of a lit cigarette melts the foam.
This homemade foam boat “caught” fish ranging from the village of Rogozhkino on the Lower Don to the Dry River under the Tsimlyansk reservoir; traveled almost the whole river Manych and was on the Veselovsky reservoir; visited the Tuzlov River and the Gorsky shallow of the Don River, etc.
The boat is small and very light, easily lifted and carried by one person. The appearance of the boat is not impressive, but when I was fishing, the fishermen asked me many times about how it was made.
It all started with the desire to have the easiest boat to transport by car.
I reread a bunch of magazines "Boats and Yachts" and decided to make a boat according to traditional recommendations by building a hull of fiberboard, followed by pasting fiberglass on epoxy resin.
The stage of cutting blanks from fiberboard went well, the bonding with wire went worse as the whole structure crawled away without holding the desired shape.
After some use of natural ingenuity, the future boat beautifully showed the bottom of the sky.
It's time to stick the fiberglass.
After several attempts, the remarkable construction was destroyed with unprecedented speed.
In order to glue glass fiber with epoxy resin, it is necessary to have skills that I did not have as well as the thoughts of earning money by making boats.
At the time of the destruction of the future boat, a very simple idea was born in my head, which was quickly embodied in a material form.
The content was moved from the page "Homemade boats for fishing" killed to death
Expected serious editing.
Today is May 2016
How to make a boat out of foam with your own hands
Sheet foam was purchased and, just available for sale, construction foam.
The foam was cut into pieces, twisted with screws and glued with foam.
The result is great.
Foam boat:
- absolutely unsinkable,
- weighs very little
- light on oars.
The boat is not very beautiful :), but the main thing is not beauty but practical effect.
It is likely that this story will push someone's thought in the right direction.
The boat has long been idle in the yard. It is likely that more useful.
- The length of the boat is 260 cm.
- Board height 34 cm.
- Width 100 cm.
- Foam thickness: board 50 mm. bottom 70 mm.
In the stern and in the bow were screwed with board screws. They are rotten with old age.